Guide to Temporary Fence Components and Installation
Frishine Temp Fence introduces components and installation process of temporary fence barriers. This comprehensive manual offers the selection of premium materials, detailed descriptions of fence components, and a step-by-step approach to fence assembly and installation. From galvanized steel fence panels to the connecting clamps and bases.
Materials in Steel Temporary Fence Construction
Steel temporary fences are primarily constructed using following materials:
1. Galvanized Steel Panels
- Description: The panels are made from high-quality galvanized steel. The galvanizing process products the steel material with a protective layer of zinc, from corrosion and rust. These panels features robust structure and corrosion resistance, ideal for outdoor applications.
- Applications: Construction sites, event barriers, public safety zones protection.
2. Steel Posts
- Description: Steel posts support the fence panels. The fence posts have the same finishes with the fence panels, heavily galvanized against rust and corrosion. Available in diverse pipe / bar sizes and shapes (e.g., round, square), these posts can meet different fencing installation needs.
- Applications: Support and anchoring of fence panels.
3. Steel Clamps and Connectors
- Description: Clamps, and connectors are important for securing fence panels to post, ensure the stability and integrity of the temporary fencing. Fabricated from durable steel, these components are designed to fasten the fence panels and posts to form a whole fencing system.
- Applications: Connection and stabilization of fence panels.
4. Bases and Feet
- Description: Options include plastic, rubber, or other materials. Plastic and rubber bases are lightweight and portable, suited for temporary or mobile uses.
- Applications: Ground stabilization of temporary fences.
5. Wire Mesh and Infills
- Description: For enhanced security and privacy, some steel fences incorporate wire mesh or infill panels. The infilling steel mesh is made from steel wire or PVC-coated wire mesh, designed to prevent the passage of small objects and provide a degree of visual privacy.
- Applications: Increased safety and privacy, particularly in densely populated or sensitive areas.
6. Bracing
- Description: Cross braces and diagonal supports are used to reinforce the temporary fences, safeguarding against collapse under wind or applied pressure. This additional bracing is crucial for maintaining the stability of the fence, especially over extended lengths or in wind-prone areas.
- Applications: Reinforcement and stabilization of portable temporary fences.
7. Reflective Elements
- Description: To improve visibility and safety, temporary fences may include reflective elements. Elements can be reflective tapes or coatings applied to the fences.
- Applications: Safety enhancement for fences installed near roads or in areas requiring heightened visibility.
Overall, the combination of galvanized steel panels, posts, clamps, bases, and optional infills or reflective elements creates a versatile and robust steel temporary fence. These materials ensure that temporary fences offering a reliable and secure enclosure for various applications.
Surface Treatments for Steel Temporary Fences, Barriers and Guardrails
Here’s an overview of the most common surface treatments applied to steel temporary fences:
1. Galvanizing
- Process: In galvanization, steel components are coated with a layer of zinc. This coating process involves immersing the steel parts in a molten zinc bath, resulting in a robust, protective layer that significantly enhances the steel’s resistance to rust and corrosion.
- Benefits: Galvanized steel fences are exceptionally durable and suitable for long-term outdoor use, providing reliable performance in various weather conditions without significant maintenance requirements.
2. Powder Coating
- Process: Powder coating involves applying a dry, powdered paint compound to the steel surface using an electrostatic process.
- Benefits: The powder coating treatment offers an attractive, durable finish that resists chipping, scratching, and fading. Powder-coated steel fences come in a wide range of colors, providing flexibility in design and decoration to match different environments and preferences.
3. PVC Coating
- Process: PVC coating is applied by covering the steel components with a layer of polyvinyl chloride (PVC). This plastic coating is applied over the galvanized steel to provide an additional protective layer against environmental elements.
- Benefits: PVC-coated steel temporary fences offer enhanced corrosion resistance and are available in various colors. The smooth finish also makes these fences more visually appealing and less prone to damage and wear.
Tips for Choosing Surface Treatments
- Choice of Treatment: The selection of a surface treatment depends on the specific requirements of the application, including the desired level of durability, the environmental conditions to which the fence will be used, and preferences.
- Maintenance: While all treatments improve the fence’s resistance to wear and corrosion, maintenance needs of the fence can vary based on the type of treatment and the conditions of use.
- Environmental Impact: Consideration should also be given to the environmental impact of the surface treatment processes and materials used, with preference often given to options that minimize harmful emissions and waste.
Welcome to contact us if you are not sure what kind of fencing materials to be used.
Guide to Installing Construction Site Temporary Fences
Follow these steps to ensure a successful installation of the temporary construction site fences:

1. Preparation Phase
- Site Assessment: Conduct a thorough assessment of the site to determine the most effective layout for the temporary fence. Consider the terrain, entry points, and any potential hazards.
- Material Checklist: Ensure you have all necessary materials, including steel fence panels, steel clamps or couplers, cement or strong plastic bases, and any required tools for installation.
- Safety Equipment: Equip all personnel involved in the installation process with the appropriate personal protective equipment, including gloves, safety goggles, and sturdy footwear.
2. Assembling Fence Panels
- Layout: Start by laying out the fence panels on the ground along the planned perimeter of the fenced area.
- Panel Connection: Use steel clamps or couplers to securely connect the panels. It’s essential that these connections are tight and secure to prevent any gaps or weak points in the fence.
3. Installing the Plinth Base
- Cement Base Option:
1)Dig holes at predetermined intervals along the fence line for the cement plinths.
2)Prepare the concrete mix and pour it into the holes.
3)Insert the plinths into the wet concrete, ensuring they are level and spaced correctly.
4)Allow the concrete to fully cure before proceeding with the fence panel installation. - Strong Plastic Base Option:
1)Position the strong plastic bases at regular intervals along the planned fence line.
2)Ensure these bases are level and securely interlocked if applicable.
4. Securing Fence Panels to the Base
- Placement: Carefully place the bottom of the fence panels into the slots or receptacles on the plinths.
- Stability Check: Verify that the panels are securely fitted into the base, providing a stable and upright barrier.
5. Leveling and Alignment
- Adjustments: Use leveling tools, such as a spirit level or laser level, to ensure that the fence is perfectly straight and level. Adjust the positioning of the bases as necessary to achieve optimal alignment.
6. Final Step in Installation
- Secure the Top: For taller fences or in windy areas, consider attaching stabilizing bars or supports at the top of the panels for additional security.
- Inspection: Conduct a final inspection of the fence to ensure it meets all safety and stability requirements.
- Regularly check the fence throughout the construction project for any signs of wear or damage, and make necessary repairs.
7. Tip for Post-Use
- Disassembly and Storage: Once the construction project is completed, carefully dismantle the fence and store the components for future use. Proper storage will extend the life of the fencing materials.
By following above detailed steps, you can install a temporary fencing durable and reliable for maintaining safety and security throughout the duration of the construction project.
Temporary fencing installed:
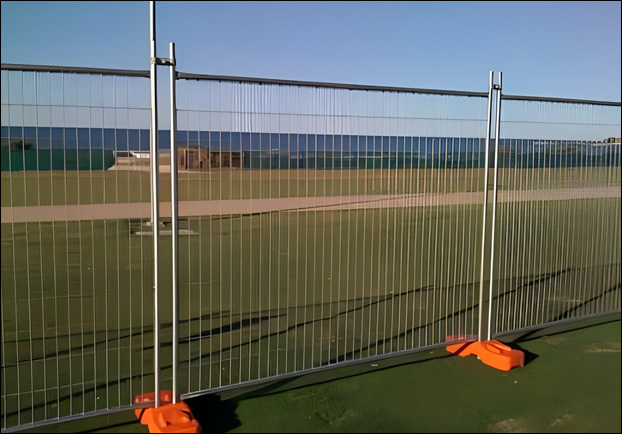
A roadside temporary fencing system of interconnected galvanized steel panels featuring a grid pattern for visibility. It is stabilized by broad, flat, orange plastic feet placed at regular intervals, ensuring a sturdy, continuous barrier. The system is a temporary fence at height of 3 feet 3 inches, including:
- Galvanized steel fence panels.
- Galvanized steel fence frames.
- Galvanized steel clamps.
- Injection-molded temporary fence rubber feet.